• Skip to primary navigation
  • Skip to main content
  • Skip to primary sidebar
  • About
  • Recipes
  • Vegan
  • Contact
  • DIY
  • Travel

Courtney's Homestead

menu icon
go to homepage
  • About
  • Recipes
  • Vegan
  • Contact
  • DIY
  • Travel
    • Facebook
    • Instagram
    • Pinterest
  • search icon
    Homepage link
    • About
    • Recipes
    • Vegan
    • Contact
    • DIY
    • Travel
    • Facebook
    • Instagram
    • Pinterest
  • ×
    Home » DIY

    Published: Feb 28, 2019 · Modified: Mar 15, 2019 by Courtney Hunter · This post may contain affiliate links · 2 Comments

    -Lava rock Fireplace Makeover-

    Sharing is caring!

    115 shares
    • Share
    • Tweet
    Finished!

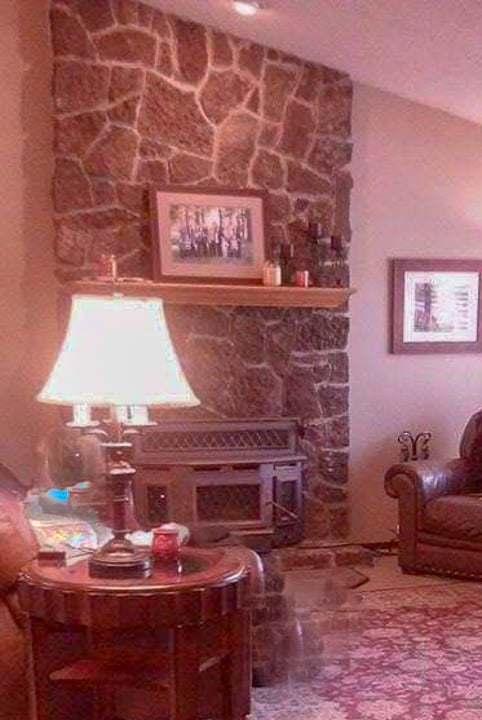
    I am not a fan of lava rock fireplaces. I know it was a very popular nice option in the era of the home, but this farmhouse style loving mama didn't like it. We lived here for almost three years before tackling this one. We couldn't decide exactly what to do. And to be honest I leaned towards the least amount of work ;-/

    before

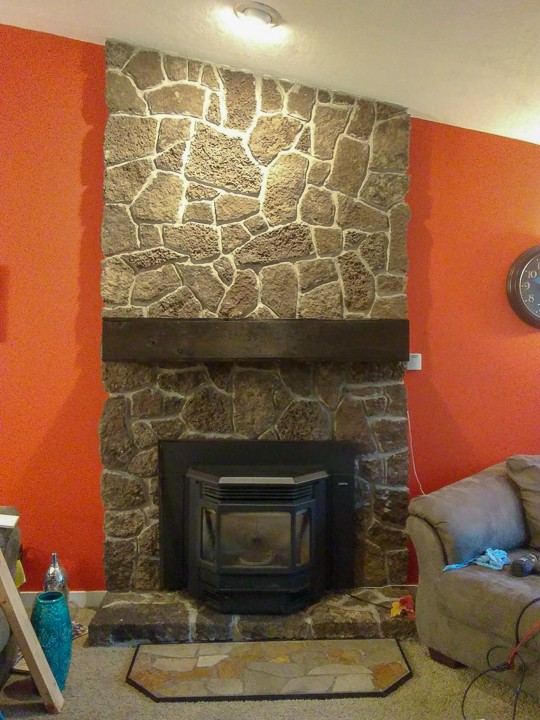
    This thing is a BEAST. It spans floor to vaulted ceiling, taking out all that rock was not on my to do list. So, we went with the cover up.

    We started by..

    Measuring out our furthest rock that was sticking out and made a surround for our plywood to go on. This didn't take very long, my husband is pretty handy in the saw (this is the saw we use, it's fairly spendy, but we like it) department. Then you have to cut the plywood to fit over this (picture coming)
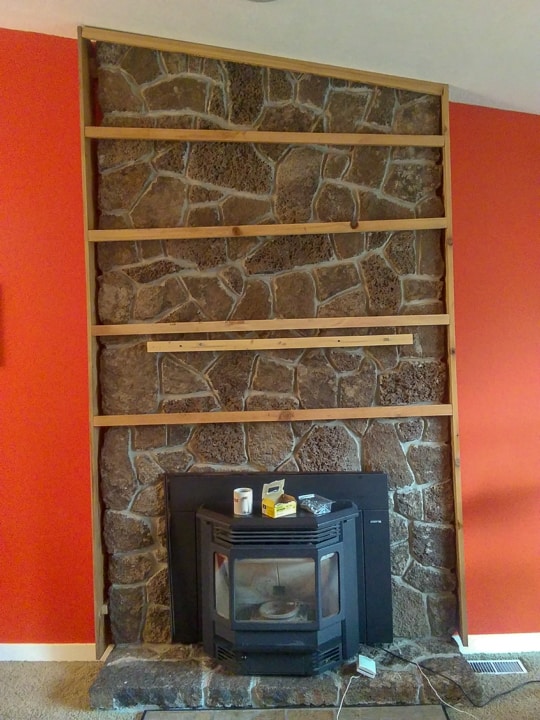
    Once it's framed...

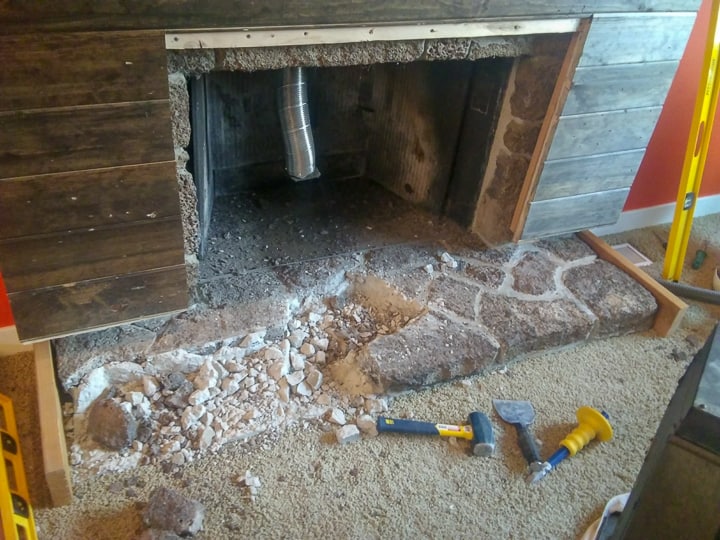
    To the bottom, we had to take a different approach. You can't put a stove on top of wood for obvious reasons. We were lucky enough to have a friend that works for a granite shop. They used the scraps and cut it to our specifications so we were able to have a nice solid granite piece. It is worth checking your local granite yards for scraps, they typically will give these away for free. The hook is; you have to pay them to cut it to your specifications.
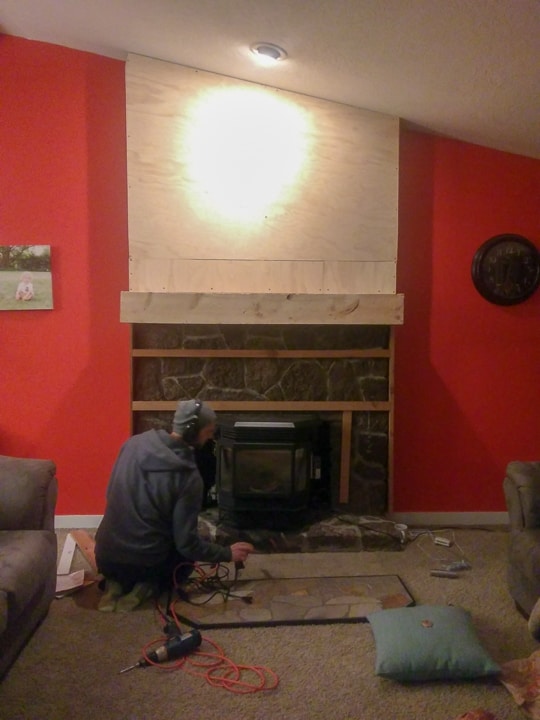
    This was a cell phone picture, sorry for the blinding bright spot.

    The bottom rock...

    Was the worst part of the whole thing. The rocks were very uneven and you can NOT put heavy things on uneven granite ( it will bust it), so we needed this 100% level. We ended up having to take out quite a few rocks, which isn't easy. Make sure you use safety glasses! We used this masonry chisel and a sledge hammer, after some serious work and several days or weeks. We finally had them out! Once they were removed we were able to build a box on the bottom for the granite to sit on.

    This gives me nightmare =D

    Next was the fun part...

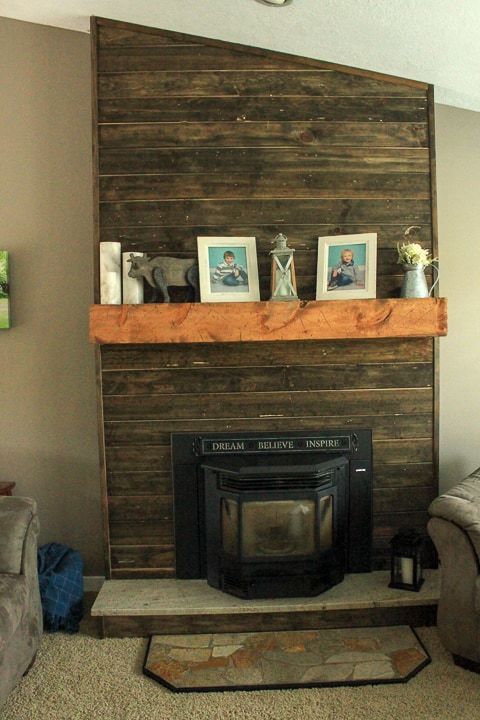
    We picked a blue pine tongue and groove for the wood. You want to make sure to use a tongue and groove or ship lap, that way you can hide your nail holes. We cut them to size and started slapping them up using our nail gun. I wish I had more pictures. The angles at the top are the worst. My husband did all of that and he did an awesome job. If you don't get them 100% on you can always use a finishing trim, which we did just to trim it all out. You do the same thing on the sides, making sure it all lines up nicely. We finished it with some corner trim on the edges and a trim across the top.

    This is the original, before we owned the house. (PS that is not a ghost, that is my terrible photo editing skills =)

    I recommend staining the boards and trim before putting them up, but it's not mandatory. I did not and ended up staining it in my house and stain is the worst! It smells so awful for so long, and it was in the dead of winter, so we couldn't air out the windows, whoopsie.

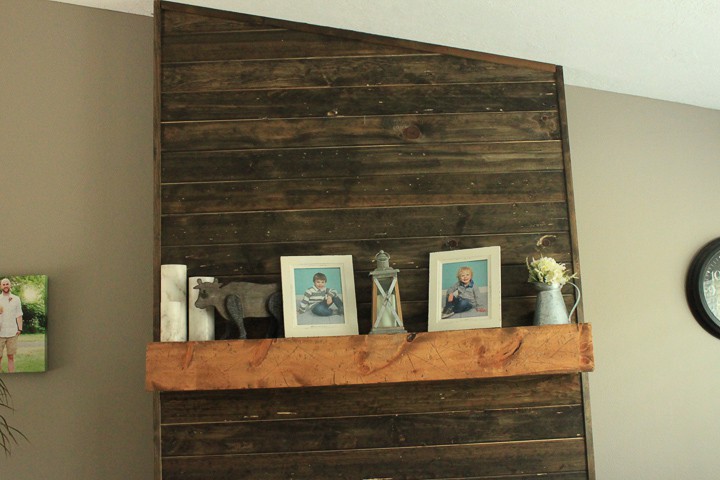
    My handy guy also made me that mantel that I love! I will have to do a post on how he did it. If you have any questions let me know!

    Do you love or hate lava rock? Let me know in the comments!

    More -DIY (Do it yourself)-

    • Painting Ikea Cabinets
    • Fence board plank wall
      - Fence Board Accent Wall-
    • -Cheap And Easy Farmhouse Mirror-
    • DIY Faux Fireplace

    Sharing is caring!

    115 shares
    • Share
    • Tweet

    Filed Under: DIY

    Reader Interactions

    Comments

      Leave a Reply Cancel reply

      Your email address will not be published. Required fields are marked *

      Recipe Rating


    1. Trevor Bashein says

      November 01, 2020 at 1:17 pm

      What did you use to attach the ply wood to the rock? Did you need to make pilot holes or just nail it in?

      Reply
      • Courtneys Homestead says

        November 01, 2020 at 1:18 pm

        Hi Trevor!
        We used concrete screws and we did use pilot holes, we used a hammer drill.

        Reply

    Primary Sidebar

    Hey there! I'm Courtney a self-taught vegan cook and baker, as well as a recipe developer and food photographer based in Oregon. My cooking style revolves around giving classic recipes a vegan twist. Whether you're a die-hard vegan or not, I'm here to share my absolute favorite plant-based recipes that are sure to satisfy everyone's taste buds. Come on in and discover your new go-to vegan recipe that will make you proud to share! Want to learn more about me? Check out my About Me page.

    Fall Favorites

    • Single slice of vegan pumpkin pie on a blue plate.
      Easy Vegan Pumpkin Pie
    • One slice of vegan apple pie on a blue plate with vanilla ice cream and a caramel drizzle.
      Easy Vegan Apple Pie
    • Vegan Apple Cider donuts cut in half, stacked on top of each other.
      Vegan Apple Cider Donuts
    • Single vegan pumpkin cookie on a white background with some cookie crumbs around it and a cinnamon drizzle on the cookie.
      Vegan Pumpkin Cookies

    Most Popular Recipes

    • pink sugar cookie on a cooling rack.
      Easy Vegan Sugar Cookies
    • vegan beef and broccoli close up shot.
      Vegan Beef and Broccoli
    • vegan cornbread
      The Best Vegan Cornbread
    • vegan waffles
      Amazing Vegan Waffles

    Courtney's Homestead is a participant in the Amazon Services LLC Associates Program, an affiliate advertising program designed to provide a means for sites to earn advertising fees by advertising and linking to http://www.amazon.com


    Footer

    ↑ back to top

    About

    • Accessibility
    • Terms and Conditions
    • Privacy Policy + Cookie Policy

    Newsletter

    • Sign Up! for emails and updates
    • Facebook
    • Instagram
    • Pinterest
    • Twitter
    • Instagram

    Contact

    • About Me
    • Contact

    As an Amazon Associate I earn from qualifying purchases.

    Copyright © 2025 Courtney's Homestead

    115 shares